Bring one of these colorful birthday cakes to your next party and we guarantee smiles from 10/10 people.
Which one would you want for your birthday? Comment below!
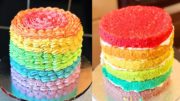
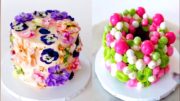
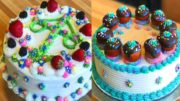
Rainbow Marshmallow Cake
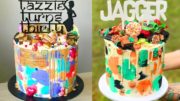
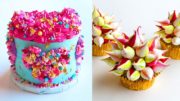
Bubble Pop Electric Cake
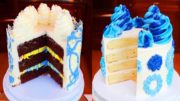
Highway Unicorn Cake
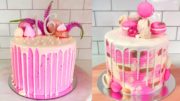
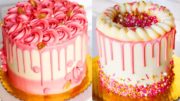
Sunday Morning Cake
Recipes are in the comments!
___
Subscribe to Tastemade:
FIND us on Snapchat Discover:
LIKE us on Facebook:
FOLLOW us on Instagram:
More daily programming
Related Posts:
 Yummy Birthday cake recipe ideas in the world (Jan) # 5 👍🍪❤️Top 10+ colorful amazing cakes 2019
 Yummy Birthday cake recipe ideas in the world (Jan) # 6 👍🍪❤️Top 10+ colorful amazing cakes 2019
 12 Best Tastemade Cake Recipes
 Wonder colorful birthday cake 🍪 Yummy Birthday cake recipe ideas in the world | Delicious Cakes
 Yummy Birthday cake recipe ideas in the world (Jan) # 6 👍🍪❤️Top 10+ colorful amazing cakes 2019
 Yummy Birthday cake recipe ideas in the world (Jan) # 7 👍🍪❤️Top 10+ colorful amazing cakes 2019
 Yummy Birthday cake recipe ideas in the world (Jan) # 15 👍🍪❤️Top 10+ colorful amazing cakes 2019
 Yummy Birthday cake recipe ideas in the world (Jan) # 16 👍🍪❤️Top 10+ colorful amazing cakes 2019
 Yummy Birthday cake recipe ideas in the world (Feb) # 7 👍🍪❤️Top 10+ colorful amazing cakes 2019
 Yummy Birthday cake recipe ideas in the world (Feb) # 17 👍🍪❤️Top 10+ colorful amazing cakes 2019.
 Yummy Birthday cake recipe ideas in the world (Feb) # 20 👍🍪❤️Top 10+ colorful amazing cakes 2019.
 Tiny Pineapple Upside Down Cake l Tiny Kitchen
 Yummy Birthday cake recipe ideas in the world (Jan) # 4 👍🍪❤️Top 10+ colorful amazing cakes 2019
 Yummy Birthday cake recipe ideas in the world (Jan) # 12 👍🍪❤️Top 10+ colorful amazing cakes 2019
 Yummy Birthday cake recipe ideas in the world (Jan) # 13 👍🍪❤️Top 10+ colorful amazing cakes 2019

SUNDAY MORNING CAKE
INGREDIENTS:
Cake:
– 429g all-purpose flour
– 265g caster (superfine) sugar
– 3 tsp baking powder
– 1/2 tsp salt
– 125g unsalted butter, softened
– 375ml of milk
– 125ml vegetable oil
– 2 tbsp Greek yogurt (can substitute with sour cream)
– 1 tsp vanilla extract
– 2 large eggs
– 2 cups cornflakes
– 2 cups fruit loop cereal
– 2 cups fruity pebbles
Milk Frosting:
– 2 batches Swiss meringue buttercream frosting.
– 1 cup full cream or skim milk powder
– ¼ cup boiling water
STEPS:
Milk Frosting:
1. To make frosting make a batch of my fluffy Swiss meringue buttercream frosting (not as sweet as American buttercream). To make the milk paste add boiling water to a mixing bowl. Add one teaspoon of milk powder, mix until combined, then add another teaspoon. Repeat this process until you’ve added half the milk powder. Then add the second half of the milk powder all at once and mix until it forms a smooth paste. It’s really important that the water is boiling and not hot tap water.
2. Add ¼ of the frosting to a large mixing bowl and add milk paste. Use a hand mixer or a stand mixer with a whisk attachment to milk until really well combined. It’s going to get a little lumpy. Keep mixing for about 5 minutes on high speed and it will get smooth. Don’t forget to scrape down the bowl so that everything mixes in properly.
3. Once that’s smooth add the rest of the frosting and mix until well combined. The frosting will taste like milk! :0)
Cake
1. Please note: the cake recipe will need to be doubled to achieve the cake in the video. I halved it in the video because most people don’t have mixing bowls big enough in their kitchens to make the entire recipe in one go :0) Let’s get stuck into the recipe!
2. Preheat a fan-forced oven to 160C (320F) or 180C (356F) for a conventional oven. Spray an 8” cake tin with oil spray and line the bottom with baking paper.
3. Start by adding cornflakes into a large jug. Pour milk over it and give it a mix. Let it sit and soak for 10 minutes to get nice and soggy.
4. In the bowl of a stand mixer fitted with the paddle attachment, add the flour, baking powder, caster sugar and salt. Turn mixer on low speed and allow it to mix for a couple minutes to help everything combine well (alternatively you may do this by sifting the ingredients together). Add the softened butter and mix until it resembles a fine sand like texture.
5. Add the cereal milk, oil, Greek yogurt, eggs and vanilla extract into the bowl with the dry ingredients and mix on medium speed until no dry ingredients are visible. Scrape down the bowl, add froot loops or favourite cereal and fold in. Please note: If I was making this cake again, I probably wouldn’t add the froot loops as they went stale in the cake. If you choose to leave them out, replace them with some colourful funfetti sprinkles.
6. Fill three 8” cake tins with batter.
7. Bake for 45 min or until a toothpick inserted comes out clean. Allow the tins to cool for 2 min and then carefully flip the cake tins over on to a cooling wrack to cool completely before using.
8. Using a large serrated knife, carefully trim the top off each layer of cake to make even and flat layers. Try to aim to get them all the same height. An easy way to do this is to find the lowest height of the cake, place a skewer or toothpick next to that point and mark it. As you go around each side of the cake cutting it, use the marked skewer to make sure each cut is at the same height.
9. To prepare crumb coat, add a dab of milk frosting onto an 8” cake board or serving plate. Add first cake layer. Use a small offset to add a layer of frosting and smoothen out and layer the frosting on each layer before adding the next layer of cake. Add more frosting around the outside to fill the grooves between each layer. This should just be a neat thin layer of frosting which is aimed at trapping any cake crumbs so that random bits of cake crumbs don’t show up on the outside of the cake. Chill for 2 hours or overnight
10. Add a fresh layer of frosting using a small offset spatula. Use a cake scraper to smoothen out the frosting around the sides. Then smoothen out the top using the cake scraper. Chill.
11. To finish add fruity pebble cereal around the bottom of the cake. Start off heavy and then add less as you go up the cake to give it an ombre effect.
12. Fit the end of a piping bag with a Wilton 8B piping tip and frost swirls on top of the cake. Finish off with a sprinkle of fruity pebbles.
HIGHWAY UNICORN CAKE
INGREDIENTS:
Cake:
– 645g all-purpose flour
– 400g caster (superfine) sugar
– 1 tsp salt
– 4 ½ tsp baking powder
– 560ml of milk
– 180ml vegetable oil
– 190g unsalted butter, softened
– 3 tbsp Greek yogurt (can substitute with sour cream)
– 1 ½ tsp vanilla extract
– 3 large eggs
– 3 drops blue food gel
– 3 drops pink food gel + 3 drops purple food gel
– 3 drops pink food gel
– 3 tsp strawberry essence (or any flavour you like)
– purple pony sprinkles (www.fancysprinkles.com)
– rainbow confetti sprinkles
Gold Drip
– 2 tsp gold lustre dust (can be purchased online or at any cake supply store)
– 4 tbsp vodka or vanilla extract
Frosting
– 3 batches of swiss meringue buttercream recipe on thescranline.com
– 3 drops blue food gel
– 3 drops pink food gel + 3 drops purple food gel
– 3 drops pink food gel
– 3 tsp strawberry essence
Optional
– ½ batch highway unicorn macarons
STEPS:
1. Preheat a fan-forced oven to 160C (320F) or 180C (356F) for a conventional oven. Spray an 8” cake tin with oil spray and line the bottom with baking paper.
2. In the bowl of a stand mixer fitted with the paddle attachment, add the flour, baking powder, caster sugar and salt. Turn mixer on low speed and allow it to mix for a couple minutes to help everything combine well (alternatively you may do this by sifting the ingredients together). Add the softened butter and mix until it resembles a fine sand like texture.
3. Add the milk, oil, greek yogurt, eggs and strawberry essence into the bowl with the dry ingredients and mix on medium speed until no dry ingredients are visible. Scrape down the bowl and mix for another 20 seconds.
4. Separate batter into three separate bowls. Add pink food dye and mix until well combined to one bowl. Repeat with two other bowls. Add pink and purple to make the purple and blue to make the blue. Be careful not to over mix your batter. You just want to fold the colour until well combined.
5. Transfer each colour into a separate piping bag and pipe random blobs of each colour into an 8 inch cake tin. Fill each cake tin just above half way.
6. Bake for 30 min or until a toothpick inserted comes out clean. Allow the tins to cool for 2 min and then carefully flip the cake tins over on to a cooling rack to cool completely before using.
7. Using a large serrated knife or cake leveler, carefully trim the top off each layer of cake to make even and flat layers. You can make each cake layer however thin or thick you like. I got about 3 useable layers of cake from each of the three cakes. Try to aim to get them all the same height. If you don’t have a cake leveller, an easy way to do this is to find the lowest height of the cake, place a skewer or toothpick next to that point and mark it. As you go around each side of the cake cutting it, use the marked skewer to make sure each cut is at the same height.
8. To prepare crumb coat, add a dab of frosting onto an 8” cake board or serving plate. Add first cake layer. Use a small offset to add a layer of frosting and smoothen out and layer the frosting on each layer before adding the next layer of cake. Add more frosting around the outside to fill the grooves between each layer. This should just be a neat thin layer of frosting which is aimed at trapping any cake crumbs so that random bits of cake crumbs don’t show up on the outside of the cake.
9. Add a fresh layer of frosting using a small offset spatula. Use a cake scraper to smoothen out the frosting around the sides. Then smoothen out the top using a the cake scraper. Chill.
10. Separate two batches of Swiss meringue buttercream into three bowls. Colour each one blue, pink and purple using the same formulas as the batter.
11. Transfer to a piping bag and pipe two layers of frosting starting with the blue at the bottom, followed by the purple. I actually made a lighter purple as well, and then finish with the pink. Use a large cake scraper to go around the cake to smoothen out the frosting. Scrape any excess frosting on top using a sharp knife and use the cake leveller to even out the top. Continue scraping until the cake is smooth on the sides and top. Chill for 1-2 hours.
12. Stick some sprinkles to the bottom of the cake using your hands.
13. Drizzle some chocolate sauce over the sides of the cake and chill again for 1 hour. Mix the gold lustre dust and vodka or vanilla extract together and use a small food safe brush to paint the chocolate drips with the gold. You may need to go over it twice. This takes a while guys. Have patience! Listen to Beyoncé in the background or your favourite podcast!
14. Fit the end of a piping bag with a Wilton 1M tip and frost some high swirls of pink Swiss meringue buttercream frosting. Make em high baby!
15. Add the macarons on top to finish off, this is completely optional! If you want to use the macarons, I’d recommend making them the day you bake the cake. This whole thing is a two day process. Baking and crumb coat and then the decorating. Store the macarons in an air tight container at room temp until you’re ready to use them! :0)
BUBBLE POP ELECTRIC CAKE
INGREDIENTS:
Cake:
– 850g all-purpose flour
– 530g caster (superfine) sugar
– 1 tsp salt
– 2 tbsp baking powder
– 750 ml of milk
– 250ml vegetable oil
– 250g unsalted butter, softened
– 4 tbsp Greek yogurt (can substitute with sour cream)
– 2 tsp vanilla extract
– 4 large eggs
– 4 drops deep pink Americolor food gel
– 2 tsp strawberry essence
– 2 tsp bubblegum essence
– Pink sprinkles. I used 4 different sizes or pink round sprinkles. But you can achieve the same gradient sprinkle effect with just one type of pink sprinkles! :0)
Gelatine Bubbles:
– 20 small balloons
– 28g powdered gelatin
– 1 or 2 drops Americolour Deep Pink gel colour
– 8 tablespoons cold water
Frosting:
– 2 batches Swiss meringue buttercream frosting.
– 1 tsp boysenberry essence
– 2 tsp bubblegum essence
– 4 drops sky blue Americolor food gel
STEPS:
Gelatine Bubbles:
1. (Please note: these are food safe but are purely for decoration and no edible. I mean you could try eating them, but you’d be chewing for months and it’s like eating plastic!) You’ll also need to prepare these on the same day you bake the cake as making this entire cake is a two day process.
2. Blow up about 20-25 food safe water balloons at about the same size, but do some little ones too. Attach blown up balloons to paper straw or cake pop sticks with tape. Gently coat each balloon with a little oil spray over each balloon and wipe it down with a paper towel. I didn’t show doing this in the video but you’ll need to do it.
3. Add water and gelatin to a microwave safe bowl. Mix until well combined. Allow it to bloom (rest) for 5 min before you place it in the microwave for 10-15 seconds, or until melted. Add pink food gel and mix until well combined.
4. Dip balloons into gelatin liquid making sure they’re coated evenly leaving the bit where the balloon meets the stick free of gelatin. You may want to coat these twice. Let the gelatin set on the first coat for 5 min, and then coat again. If the gelatin stiffens you can melt again in the microwave for 10 seconds.
5. Place the coated balloons standing upright in a cup or in a Styrofoam block and allow to dry completely- about 24 hours.
6. To remove balloon, cut away from the stick and pull the balloon out from the bubble. You’ll need to cut away the bottom of the bubbles so they sit evenly on top of the cake. You can do this using a pair of scissors.
Frosting
1. To prepare frosting add blue food gel, boysenberry and bubblegum essence. Mix until well combined.
Cake
1. Preheat a fan-forced oven to 160C (320F) or 180C (356F) for a conventional oven. Spray an 8” cake tin with oil spray and line the bottom with baking paper.
2. In the bowl of a stand mixer fitted with the paddle attachment, add the flour, baking powder, caster sugar and salt. Turn mixer on low speed and allow it to mix for a couple minutes to help everything combine well (alternatively you may do this by sifting the ingredients together). Add the softened butter and mix until it resembles a fine sand like texture.
3. Add the milk, oil, Greek yogurt, eggs, pink food gel, strawberry essence, bubblegum essence and vanilla extract into the bowl with the dry ingredients and mix on medium speed until no dry ingredients are visible. Scrape down the bowl and mix for another 20 seconds.
4. Fill three 8” cake tins with batter.
5. Bake for 30 min or until a toothpick inserted comes out clean. Allow the tins to cool for 2 min and then carefully flip the cake tins over on to a cooling wrack to cool completely before using.
6. Using a large serrated knife, carefully trim the top off each layer of cake to make even and flat layers. Try to aim to get them all the same height. An easy way to do this is to find the lowest height of the cake, place a skewer or toothpick next to that point and mark it. As you go around each side of the cake cutting it, use the marked skewer to make sure each cut is at the same height.
7. To prepare crumb coat, add a dab of frosting onto an 8” cake board or serving plate. Add first cake layer. Use a small offset to add a layer of frosting and smoothen out and layer the frosting on each layer before adding the next layer of cake. Add more frosting around the outside to fill the grooves between each layer. This should just be a neat thin layer of frosting which is aimed at trapping any cake crumbs so that random bits of cake crumbs don’t show up on the outside of the cake.
8. Add a fresh layer of frosting using a small offset spatula. Use a cake scraper to smoothen out the frosting around the sides. Then smoothen out the top using a the cake scraper. Chill.
9. Carefully add sprinkles to the bottom of the cake. I resorted to creating a huge mess by throwing them onto the cake. I didn’t want to touch my precious frosting with my warm hands and risk giant fingerprints in the cake. I didn’t lose that many sprinkles and I swept up whatever fell on the floor and ate them. Kidding! I threw them in the bin lol.
10. I started with my bigger round sprinkles at the bottom and worked my way up using smaller ones with the big sprinkles and then less and less sprinkles as I got to the top of the cake.
11. Finish off the cake by carefully placing the small gelatin bubbles around the outside of the top of the cake and the bigger ones in the centre.
RAINBOW MARSHMALLOW CAKE
INGREDIENTS:
Rainbow marshmallows:
– 3 cups granulated sugar
– 6 tbsp gelatine powder + 1 1/3 cup cold water
– 1 1/3 cup hot water
– 2 tsp vanilla extract
– 3 drops yellow food gel
– 3 drops green food gel
– 3 drops blue food gel
– 3 drops purple food gel
– 3 drops pink food gel
– 3 drops orange food gel
Cake:
– 430 g 15 oz plain (all-purpose) flour
– 265 g (91/2 oz) caster (superfine) sugar
– 3 teaspoons baking powder
– 1/2 teaspoon fine salt
– 125 g (41/2 oz/1/2 cup) unsalted butter, softened
– 2 large eggs
– 375 ml (12½ fl oz/11/2 cups) full-cream (whole) milk
– 125 ml (4 fl oz/1/2 cup) vegetable oil
– 2 tablespoons Greek yoghurt (or sour cream)
– 1 teaspoon vanilla extract or vanilla bean paste
– 2 cups confetti rainbow sprinkles
Frosting:
– 1 batch swiss meringue buttercream frosting
– 3 drops yellow food gel
– 3 drops green food gel
– 3 drops blue food gel
– 3 drops purple food gel
– 3 drops pink food gel
– 3 drops orange food gel
Decorations:
– 1 cup large rainbow confetti sprinkles
– ½ cup large rainbow confetti sprinkles
– ½ cup large rainbow confetti sprinkles
STEPS:
Rainbow Marshmallows:
1. Grease a 4cm deep, 20cm x 20cm baking tin slab pan. Line the base and sides with baking paper, allowing a 3cm overhang at both long ends.
2. Combine sugar and hot water in a saucepan over medium heat. Cook, stirring for 3 minutes or until sugar dissolves and syrup is clear.
3. Using a whisk or fork, combine gelatine and cold water in a jug. Pour this mixture into the hot syrup. Cook, stirring, for 2 to 3 minutes or until gelatine has dissolved and mixture is clear. Pour into bowl and set aside to cool to room temperature (about 30 minutes). If the gelatine sets, pop it in the microwave for 15 seconds to liquify again and allow to cool for 5 minutes.
4. Using a stand mixer, beat sugar and gelatine mixture on high for 6 to 10 minutes or until very thick. Add vanilla and food colouring to reach desired colour and beat for 1 minute.
5. For this next bit, you’ll need to work quickly, because the gelatine can set quickly.
6. Split the mixture into 6 different bowls. Add each food gel into each one and use an electric mixer to mix the colour in. If you find your marshmallow mixture is setting, microwave it for 10 seconds to help soften it.
7. As you pour each layer into the prepared pan, make sure it’s not set. It needs to be about the same consistency as cake batter. That’s why microwaving it might be a good idea to be able to reach that consistency. Begin by adding the purple, followed by the blue, green, yellow, orange and finish with the pink. Add some sprinkles on top before you add it to the fridge to set for 4 hours.
8. Once it’s set, lift it out of the cake tin and use a large knife to cut into squares. Please note: the marshmallows need to be put on the cake no longer than a couple hours before serving otherwise they will begin to dry out.
Frosting:
1. To prepare the frosting, split into 6 large mixing bowls. Add each separate food gel colour and mix using a hand mixer until well combined. Add each one into a piping bag and set aside.
Cake
1. Please note: to make the 6 layered cake in this recipe, you’ll need to make 2 batches of vanilla cake. All other recipes and measurements are enough to put the cake together and decorate it.
2. Preheat a fan-forced oven to 140C (280F) or 160C (320F) for a conventional oven. Spray three 8” cake tins with oil spray and line the bottom with baking paper. Set aside
3. Add the flour, sugar, baking powder and salt to a large mixing bowl and mix together using a hand mixer until well combined.
4. Next add the softened butter and mix on low speed until mixture reaches a crumbly sand like texture.
5. Add the eggs, milk, oil, Greek yogurt and vanilla extract. Mix on low speed until no dry ingredients are showing. Scrape down the bowl and mix for another 20 seconds.
6. Fill three 8” cake tins with batter. I find using an ice cream scoop to help me do this makes it easy to distribute the batter evenly so that everything bakes at the same time. Pour 1/3 of the sprinkles into each cake tin and mix into the batter.
7. Bake for 50-60 min or until a toothpick inserted comes out clean. If the pick comes out with wet batter, bake for a further 10 min at a time until fully baked. Allow the cakes to cool to room temperature inside the cake tins and then chill them in the fridge overnight. Chilling your cakes overnight makes them easier to trim and decorate. So I bake my cakes the day before I decorate them.
8. Allow the cakes to cool to room temperature in the tins, then chill them in the fridge overnight. Chilling your cakes overnight makes them easier to trim and decorate, so I always bake my cakes the day before I decorate them.
9. To trim your chilled cakes, use a cake leveler or large serrated knife to carefully trim the crust off the top of each cake before you trim each cake in half. You’ll end up with 6 layers of cake.
10. This cake is a lot easier to make than most other cakes, because you don’t need to crumb coat, chill, then add a final layer. Instead we’re going to fill the cake inside a tube that you’ll create using acetate. Acetate is a plastic sheet. You’ll need a piece measuring about 29cm in height and 70cm in length.
11. Place the plastic sheet inside an 8” cake tin. Use sticky tape to stick it to the cake tin. Also, take care to stick the two ends together so that it all stay together as you’re filling it. Do your best to make sure the plastic sheet stands straight and isn’t slanted. If it’s a little slanted, don’t worry, it will straighten out when you start filling it.
12. Place the first layer of cake in the plastic tube. Then pipe a layer of purple frosting. Gently tap the cake tin against your workbench and repeat with each coloured frosting in the order of the rainbow until you get to the final layer. Finish with the final layer of cake and the pink frosting on top. Chill the cake in the fridge for 5 hours. Overnight is best.
13. Take the cake out of the cake tin and cut the tape away from the cake to unwrap it from the acetate plastic.
14. Add large sprinkles down he bottom of the cake. If you find that the sprinkles won’t stick to the cake add a little bit of frosting behind the sprinkles to help them stick to the cake. Add medium from the bottom of the cake to about half way and then add the smaller sprinkles from the bottom of the cake to the top. This will help you get an Ombre of sprinkles effect.
15. Finish by adding the marshmallow squares on top.